
Tagging content in Journity allows you to create specific segments to move users through your marketing funnels and toward deeper engagement with your organization. Below we have outlined the different ways you can create tags and groups in Journity along with their best practices. As you get started please note that tags are case sensitive. We recommend making all tags lowercase (i.e. email instead of Email) as a policy to ensure consistency, however, if you choose another model do make sure to keep it consistent.
Waypoint Tags:
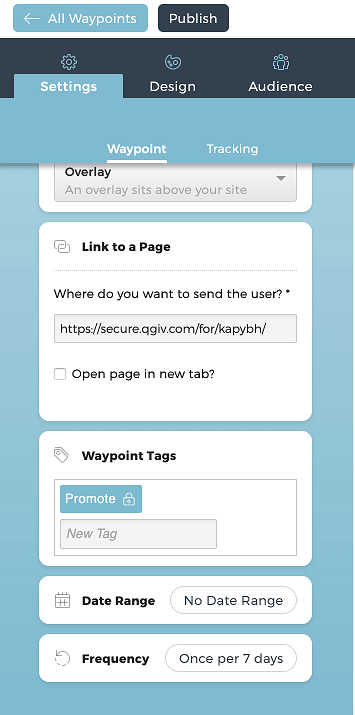
These are the easiest tags to implement, they are created in the Settings Tab within the Waypoint themselves. You can create as many tags as you like here, for people that viewed, clicked or converted on your Waypoint.
Best Practice:
We recommend creating three separate tags on each action of each Waypoint. This will keep your segments consistent and allow for maximum targeting options. We append the action to the tag type, for example “donorviewed”, “donorclicked”, and “donorconverted”.
- General Type Tag: This is your overall goal for the Waypoint. Example “subscriber”, “donor”, “volunteer” this will allow you in the future to target anyone who volunteered or showed an interest in volunteering.
- Date Specific Tag: This will allow you to know seasonality trends for specific users. The formula here is general type tag + month + year. For example donor042019.
- Campaign Name Specific Tag: This will include your specific campaign name or ID. We do recommend making the identifier easily readable i.e. using “givingtuesday” instead of “114QZW” this allows anyone reviewing the account to understand your tags. If you use internal IDs that are nondescript you can add both a keyword focused tag and an ID tag.
Note: It is important to include conversion tracking for your Waypoint in order to tag users as converted.
Website Tags:
The Waypoint tags will collect users that convert through the Waypoint itself, however, in most cases you will have multiple channels directing traffic to your conversion pages. To capture for example all users that make a donation through your website or subscribe through your website you will want to also include website tags. You can add these tags to your website by creating an additional code snippet and adding it to your conversion page, immediately after the main Journity code.
The naming convention for this tag should follow the “General Type” naming convention to match the Waypoint tags
<script>
_jt_("add-group", "Tag Name Here")
</script>
Best Practices:
We recommend adding website tags to all conversion confirmation pages, this will ensure any conversion taking place on your website whether it happens inside Journity or through another channel will be segmented properly.
Advanced Use: If you have a multi-step checkout process you can create tags for each step then retarget users that fell out of the conversion funnel. For example if someone added and item to their cart, then proceeded to the billing information page, but never completed the purchase you could send them a message the next time they visit the site.
URL Parameters:
Just like you would want to create segments from users that converted outside of Journity, you can also create campaign or channel specific tags by adding URL parameters to your specific campaigns. These tags should correspond to the “Campaign Name Specific Tag” as outlined in the Waypoint tags section. For example if you are running a Giving Tuesday campaign and promoting it through Google’s Ads Grant, you would be sending the user directly to the landing and would want to segment those users as interested in Giving Tuesday promotions. The format for the URL parameters is as follows:
?journitygroup=tag-name-here
So
would become
Best Practices:
This tag naming convention would follow the same naming convention as the campaign specific naming tag as outlined in the Waypoint tags section.
Importing Tags:
You may already have a list of users within your CRM or Email Service provider accounts that you want to get into Journity and group appropriately. You can do this easily by importing their IP addresses. To do this you navigate to “Reports->Tags->Import” the format for this is to upload a CSV file in which one column is called “IP Address” and one column is called “Group”.
Best Practices:
You should at a minimum import these as general tag types (subscriber, donor, volunteer etc.) however, this also allows you to create more advanced segments based on any data contained within your CRM. Some examples of these segment types are:
- Email Reclamation - Create a segment of email users that have unsubscribed from your list and offer them reasons to resubscribe.
- Recurring Donations - Users that have made multiple 1 time donations can be encouraged to sign up as recurring donors.
- Specific Dollar Values - If donors previously donated $XXXX amount you can show them a specific message compared to those who donated $XX.
- Matching Offline events - If you recently called someone in your CRM you can show them relevant messaging if they visit the website as a result.
UTM Tracking Parameters:
If you use Google Analytics you should also be tagging your campaign links with UTM parameters for tracking through Google Analytics. We also recommend adding these to the links you use in your Waypoints so you can see how Journity performs compared to other channels.